
It is important that players develop their fundamental man to man defensive skills before trying to develop a zone defence.
Unless a player can contain his opponent by maintaining good stance and position it won’t matter whether a man to man or zone defence is used and winning will be elusive.
When good defensive pressure is applied to the ball-handler it is more difficult for the offence to make effective passes, or penetrating drives to the basket. When there is strong pressure on the ball handler, defensive players can make decisions to retreat off their opponent and block driving or passing lanes, or alternatively over-play their opponent in an effort to make an interception, or force a violation.
A “passive” zone applies modest pressure on the ball and keeps all players in areas close to the basket, will often be effective against teams with poor shooting, while an aggressive zone defence that includes strong pressure on the ball and double-teaming will often be useful against teams that may not be well organised, or are too rigid with their offensive structure.
Coaches should consider as many options as possible when deciding the type of defence they prefer. The decision should always be consistent with the coach’s philosophy on how he wants the game to be played.
Coaches working with teams at higher levels can never assume the opposition has significant weaknesses that are relatively easy to exploit. When deciding on which zone to use, it is safer to assume the opposition is well organised and has equally talented personnel, which is why I have favoured the use of a “match up” zone.
The matchup zone can be described in two ways, “a man to man defence with zone principles” or ” a zone defence with man to man principles”. There are slight differences in the way each may be played, but for the purposes of this exercise we will describe the “zone defence with man to man principles”
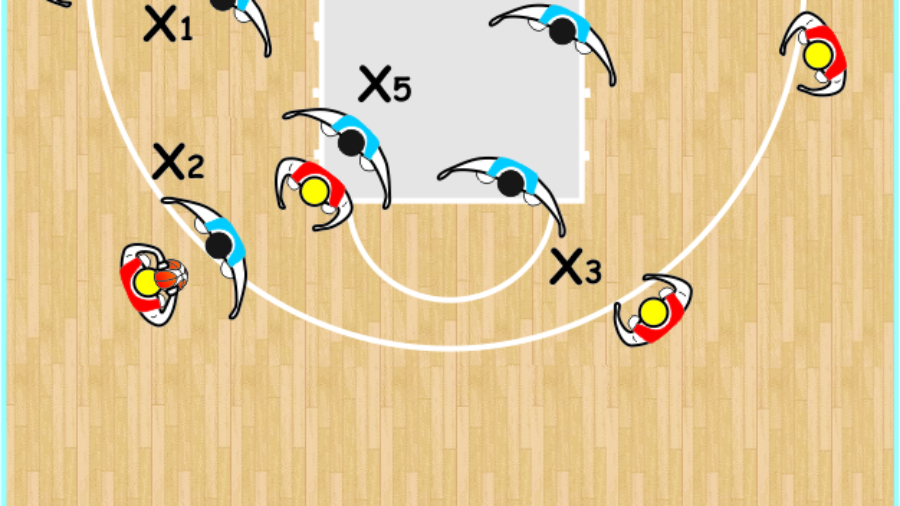
In most cases, the match-up zone will look like a 1-2-2 to start with, but after each pass, it may look like a 2-1-2 or 1-3-1 or even a straight man to man defence depending on where passes and offensive players go. Usually, defensive pressure is applied to the ball handler between the centre-line and the top of the key, but the defensive front line might be retreated to the top of the key or extended to the centre-line.
For the purpose of describing the rules of the matchup zone, we will show two guards and three forwards, but the positioning of the players will ultimately be determined by the natural talent of each individual. In the matchup zone, all players must be active and alert to the movement of every player. In fact, this might be one of the defence’s weaknesses as it is uncommon to have every player on a team with the same high level of commitment and understanding to make it successful. However, when all players are active and committed, the players respond well to the challenge and seem to have more “fun” playing defence, when it is more common for players to get their “fun” out of playing offence.
The first instruction to players is, ‘when defending the man with the ball do so as if you are playing man to man.’ Then the defensive player next to the man defending the ball must locate the next offensive player in his zone and defend him as if it is a man to man defence. The next player may have to move beyond the normal zone area to locate an opponent, especially after the opposition has made cuts through the zone. When a pass is made, the player defending the man with the ball always releases off that man and steps toward the lane, keeping vision on his man and the ball. He keeps defending his man until he releases him to a team mate.

Let’s assume 2 passes to 4 and 3 cuts through the lane to the corner. 3 would stay with his man until he reached 5 and then 5 would assume he is defending O3 as if it was man to man X3 would stay in the lane temporarily to discourage a penetrating pass while X2 would drop back to the free throw line.

